Thursday, December 6, 2012

Filled Glass Ornaments

This was a project from last Christmas but I didn't post about it then because they were Christmas gifts.  These ornaments were something I had wanted to make for a long time, but it was harder than I expected finding plain clear glass ornaments.  On a late night shopping trip, I finally had time to dig through all the boxes of ornaments, and found the only box of clear ornaments they had! (Something that would have been impossible to do on a day-time trip with the kiddos!)


Two of the ornaments I filled with sheet music from one of my favorite musicals, Les Miserables.  It just so happens it's also a favorite of my sister who was the wonderful recipient of those ornaments.  Since she's a trumpet player, I used the sheet music for a trumpet part.  Huge thank you to Google for that find!  Seriously Google sheet music for your favorite songs and search through the images.  You'll find what you need!  Well mostly what you need.  The other piece of music was a flute part, but that's okay too.


After I printed off the music, I wanted to make the pages look antique.  I dyed them with tea by steeping a teabag in a pan of hot water and dipping the page in it.  Do this carefully as the page can easily tear when wet.  I let it dry completely, and then took a match to the edges to give it a rougher look.


Then I cut the music into strips trying to keep the staves together and included the song title and composer.  The toughest part was actually getting it into the ornament.  After carefully removing the top, I wrapped the individual strips tightly around a pencil and slid them down into the ornament.  I used a bamboo skewer and sometimes one of my crochet hooks to move the pieces around inside the ornament until I had the look I wanted.

To finish it off, I tied on a nice ribbon to hang the ornament with.  (I personally hate metal ornament hooks, and one day I will replace all of mine with ribbon!)


Besides the music filled ornaments, I also made this Hello Kitty one for my other sister who is a huge fan!  The Hello Kitty gift tag was from a McDonald's kid's meal.  I just punched a hole in it to tie the pink ribbon through!  Shhh don't tell!  I also made one for my grandmother with Christmas themed Bible verses as well as filled some with pretty ribbons and other holiday decorations.  The possibilities are endless!  I wish I had taken more pictures last year because they all turned out beautiful!

*Be careful stuffing your ornaments because the glass at the top can be sharp.  I wouldn't recommend this project for small children!
Wednesday, December 5, 2012

Snowman Fridge

Frosty has returned again this year and before Christmas Day of course.  Decorating the refrigerator for the holidays is so easy and adds so much joy.  All it takes is a few pieces of construction paper and strip of wrapping paper!


Here's a picture of this year's snowman.  We got a little more creative this time.  My five year old said that snowmen have stick arms so we needed to add them too.  The top hat is also new this year.  Comparing it to our light-up snowman in the living room, we couldn't forget the black hat!

The eyes were made by tracing a bowl on a piece of black construction paper.  The buttons and mouth were made by tracing a drinking glass on the construction paper.  The nose was just cut out free hand.  I like the carrot shape I did this year much more than the plain triangle from last year!


Here's a picture of last's year's snowman fridge.  It's a little blurry I know, but someone was just a little too excited about having Frosty in the house!

*This idea is not mine.  The original came from Pinterest last year, but there are so many out there now I have no idea which one was first!

Thursday, November 29, 2012

The Crippled Lamb Story and Handprint Activity


We received this book as a present one year, and it's one of my favorite stories to read to the kids.  I love the message, and almost can't get through the story without tearing up.  I also really love any craft involving the kids' handprints so adorable handprint lambs were a must (We even made them last Easter too!)


First we gathered up all of the supplies.  I used a piece of plain cardstock to trace the kids' hands.  I wanted to turn the sheep into puppets for the kids to use while I read through the story this time, so that's what the Popsicle stick is for.  I initially planned on stapling the sheep to the stick, but I seriously underestimated the thickness of the jumbo Popsicle sticks and seriously overestimated the power of my mini stapler.  Luckily glue worked just fine instead!


I let the kids choose which hand they wanted to use and I traced and cut the handprints out for them.  Then they got to work creating their sheep.  We started by making the face with a googly eye and a black marker.


Then they covered the body of the sheep (or the palm of the hand) with glue and started attaching cotton balls for the sheep's wool.


Scunch in as many as you can as long as the glue holds.  You can tear apart the cotton balls or glue on the whole piece like we did.


After the wool was done, we added a little red bow just to make it extra special.  They also colored in the legs (or just the feet) with the black marker and attached the Popsicle sticks with the glue.


I think they turned out pretty darn cute!


Then they had fun holding them up and moving them around while we read through the story.  I loved every minute of it!


Tuesday, November 27, 2012

DIY Christmas Wreath

This is the first year we've hung a wreath on our door, but now that I have this lovely wreath it definitely will not be the last!

Christmas Wreath in daylight

I found the basic evergreen wreath at Walmart for $2.50!  I had no idea they were so cheap, and with a few simple embellishments, I turned it into this beautiful Christmas wreath.  The small ornaments and the bow I had tucked away in my Christmas tote.  The bow has a pipe cleaner on the back that I used to attach it to the wreath.  The ornaments are attached with regular ornament hooks.

The pine cones we collected last month from trees behind our house.  I hot glued them to the wreath so they wouldn't fall out.

Christmas Wreath at Night

The red ribbon I pulled out of my box of present wrapping supplies.  I love to save bows, bags, and anything else from presents I've received.  It's always neat to find ways to reuse them on special gifts.  We have a curtain rod on the back of the front door (thanks to the previous owner) which I've tied the ribbon too.  You could also use the Pinterest-learned trick of attaching a Command hook upside down on the door to hook your ribbon to.

Tuesday, November 13, 2012

Mister Seahorse Craft

Who doesn't love an Eric Carle book?  We love every one we read.  We finally picked up Mister Seahorse at the library last week, and of course had to make a seahorse after reading the book.


I have yet to fix our broken printer so instead of printing out a seahorse template, I simply traced the seahorse on the cover of the book.  Then I outlined it with black marker so the seahorse really stood out.


Then we cut brightly colored tissue paper into small squares.  The kids used watered down Elmer's glue to paint the tissue paper onto the seahorse.  The colors overlapping and blending together really make the seahorses look neat (and just like images in the book).  They glued on a googly eye once they were dry.


Such a simple craft, but they really turned out neat!


Monday, November 12, 2012

Goodbye Crayon Marks

Why is it toddlers insist on coloring every surface but paper when they get a crayon?  Most of the time I can get it up fairly easily, but our preschool cabinet was being stubborn.  None of my usual tricks were working.  So I decided to try a little rubbing alcohol as a last resort.  We use rubbing alcohol to clean several things around here, especially electronics, but I've never tried it on furniture until now.  Easiest clean up ever!  It took seconds to take the crayon off.


It took a few cotton balls to get it all off, but as you can see it ALL came off!  I removed crayon marks from both sides of the doors, the shelves, and the back of the cabinet in just a couple of minutes.

I'm sure I'm not the first person to discover this trick, but I had to share.  I'm so happy our white cabinet is actually white again!

Sunday, November 11, 2012

Montessori-Inspired Practical Life Baking Tray


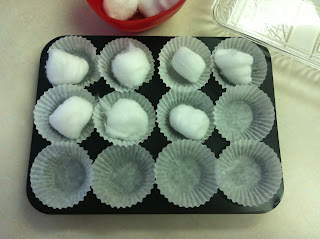
I finally got a chance to clean up our preschool cabinet and decided it was once again time to change up some of our Montessori-inspired tray activities.  I wanted to create a tray based on something that would be very useful during the upcoming holiday season, and one of things I'll be doing most over the next couple months is baking!


I took a small 12 cup mini muffin pan, a small pot holder, 12 mini paper baking cups, and 12 cotton balls (for the batter), and created a practical life cupcake baking lesson.  The kids are already obsessed with it!  They place a paper baking cup in each slot, then the "batter" into each baking cup.  Then they pop it into the oven, not the real oven though.  The piano bench has been dubbed the oven just for this activity.  Leave it to the minds of toddlers to get so creative!  They wait a few minutes, excitedly waiting for their cupcakes to bake, and then carefully pull out the pan using the potholder!


We even get to pretend eat them, and then put everything back before starting over!  With this much fun, this tray might stick around for a long time!

Saturday, November 10, 2012

Our Thankful Tree


This idea came from (don't be surprised!) Pinterest!  Bargain Bound's Thankful Tree was so cute, I had to make our own.  I took a few sheets of brown construction paper and went to town with some scissors.  I got a little wild with some of the branches but I think it at least resembles a tree.  


For the leaves, I stacked a few sheets of red, yellow, green, and orange construction paper, traced around a silk leaf from a fake plant, and cut out the leaves.  This was definitely time consuming.  Next time, I will look for some ready made leaf cutouts!


We started off with the leaves at the bottom of the tree, like the post on Bargain Bound.  However, our miniature dachshund who likes to chase and eat leaves decided she wanted to eat those leaves too.  So I moved the leaves up into the branches.


It's neat to see what the kids come up with everyday.  My two year old has a bit of difficulty with this.  I don't think she quite grasps what we're doing, but she listens to her brother and tries to come up with something.  On the first day, she chose her pink bear (aptly named "Pink"), and every day she still says she's thankful for Pink, but I tell her to choose something different each day.  Today it was cabinets.  Of course that's where she likes to play!  Without cabinets, she'd be forced to actually play in the play room or with toys!


I can't wait to see what the kids come up with as the month progresses.  They are running out of family members to choose so I'm sure it's going to get more creative!  

Friday, November 9, 2012

Paper Plate Turkey Craft


Our paper plate pumpkins were so much fun.  Well actually anything that involves finger painting turns out to be a lot of fun even if it gets a bit messy.  Since Thanksgiving is only a couple weeks away it was a perfect opportunity to create a turkey, and since we had to get showers before preschool anyway it was also a good time to finger paint.

Materials:

Paper Plate
Brown Paint
Red, Orange, Yellow, and Brown construction paper
Glue Stick
Black Marker

Directions:

Strip kids to their underwear to minimize ability to ruin clothing!  (Note:  only do this if you are making this craft at home!)  Next cover the painting area thoroughly.  I used newspaper this time, but we also like to use an old vinyl tablecloth for these types of activities.  Regardless, paint will still end up places you don't want it to.


Then set the paint down and watch chaos ensue.  This is my favorite part.  I don't know what it is about getting paint on your fingers that makes kids laugh and smile so much, but any mess created as a result is worth every bit of it!  Once the paper plate is thoroughly covered, now begin the tricky step of getting the kids into the bathtub without getting brown paint all over every surface between the table and the bathroom! Good luck!


Depending on how long it takes to give the kids a bath, the paint may or may not be dry afterward.  We took a break for an early lunch before finishing the turkeys.  Putting the turkey together turned into a great opportunity to discuss the parts of a bird.  We talked about their feet, beak, feathers, and (I had to look up what that little red thing hanging from the turkey's face was called) the wattle.


I cut the pieces out of construction paper.  I didn't have a template, I just cut.  So they aren't identical, but still cute.  Then the kids glued them on.  I helped my two year old by putting the glue on for her as a guide for where to put each piece.  My almost five year old did his all on his own, and insisted on giving his a smiley face.


He's been learning some turkey songs at school for an upcoming Thanksgiving party, and these turkeys are giving us another reason to sing and dance while practicing the songs!  Have fun!

Friday, October 19, 2012

Fall Leaf Sorting


Children LOVE to sort things.  I don't know what it is about grouping things into categories that is so instinctual for them, but they love it.  They love repeating it.  And they are really really good at it!  So creating interesting sorting activities is always on my to-do list.


I bought this bright orange condiment server to use at a birthday party, but it has since become one of our go-to sorting tools especially for smaller items.  We've used it to sort beans and pom poms and a few other things.  The bright orange color makes it the perfect fall season tray for leaf sorting too.


These little foam leaves are a good size for little hands and come in four beautiful fall colors: purple, brown, green, and yellow.  They also come in three different shapes.  So we can sort two ways!  I found these leaves in a package at our local dollar store.  An alternative would be to cut your own leaf shapes out of foam sheets or even cardstock or construction paper.  


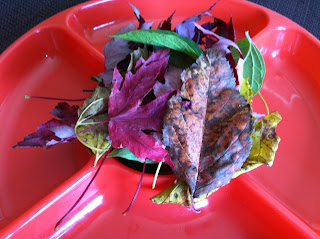
What's more fun that sorting fake leaves?  Sorting real ones of course!  The bonus here is that we get to go outside and pick up a bunch of leaves to sort through!  It's always fun to see all the wonderful colors straight from nature. 


Thursday, October 18, 2012

Paper Plate Pumpkins


Painted Paper Plate Pumpkins.  Try saying that five times fast!  No really do it!  Ok, now onto the real fun.  We enjoyed our pumpkin rice treats so much, we decided to make some more pumpkins that would actually keep around the house until Halloween.  All we needed was something round and orange, which quickly translated to paper plates and orange paint.

Supplies:
  • Plain Paper Plate
  • Orange Paint
  • Paint Brush or Fingers!
  • Black Construction Paper
  • Brown Construction Paper
  • Green Pipe Cleaner


The kids love when I drag out this old blue tablecloth.  It's one of those cheese vinyl picnic table cloths.  We only use it for painting so when they see me lay it out on the table they always get excited!  I gave them the option of finger painting or using a brush.  My oldest wanted to finger paint, and the youngest wanted to use a brush.  Well at least she started off using a brush anyway!  


After painting the plate orange (my oldest had to do both sides because pumpkins are orange all the way around!), we let them dry for a little bit...ie about 2 seconds because they just couldn't wait to make them into jack-o-lanterns!


We used black construction paper to make the eyes, nose, and mouth.  It's a good opportunity to talk about shapes.  The eyes and nose are triangles.  We started with something close to a crescent or half circle shape for the mouth and cut out squares or triangles to finish it.


The stem is a rectangle shape cut from brown construction paper.  And we finished them off with a leaf made out of a green pipe cleaner.  


Carefully poke the pipe cleaner through the plate near the stem to attach it to the pumpkin.  You could also use a hole punch to make this easier.  To make the curly vine shape, wrap the pipe cleaner around a pencil or your finger a few times and gently slide it off.


And voila, you have a super fun and easy pumpkin or jack-o-lantern to decorate with for Halloween!