Monday, September 24, 2012

I Can Do This!

Came across this amazing post this morning, and I HAD to share it.  Read it and then come back here!


I sometimes get into this funk where I feel like on the outside our home may look like that Pinterest pin where we made it perfect in 6 easy steps, but in reality...not so much.  Most of the books we picked up on our last trip to the library haven't been read.  The sink is full.  There are clothes in the washer and dryer (which reminds me maybe I should go turn the dryer back on to get rid of those wrinkles because I really don't iron).  And both kids are sick.  

Here I am sitting at my desk, drinking my coffee and blogging.  I haven't checked Facebook yet, but I will after I check my email.  I look at our schedule from last week and see all the things we didn't get done, not the ones we did.  So I'm going to make that list.  What I Want to Do, What I Need to Do, and What I'd Love to Do with my family today.  I want to read a couple of the dinosaur books we checked out from the library to the kids.  I need to go to the grocery store before pre-k to get a drink to go with the snack for my son's class.  And I'd love to do the dry pasta dinosaur fossil craft I pinned on Pinterest with the kids.

Even after listing out those three things, I'm still thinking about all the other things on a to-do list.  How I want to get a workout in, how I need to get the kitchen cleaned up, and how I'd love to really finish my own library book!  But after going back and rereading that post at Finding Joy a second time, I'm not letting the things I don't get done on my to-do list get me down.  I'm going to start focusing on the things I do get crossed off, the fun we have, and the fact that there are at least enough clean clothes that nobody is naked right now.  What's the old adage:  Don't sweat the small stuff.  And in the grand scheme of things, this is really really small stuff!

So here's what I know...


I am not Supermom or a perfect mom.  But I'll never give up.  Ever!


I can do this!

Saturday, September 22, 2012

Top 10 Reasons To Love Fall!


It's officially here!  Although it's felt like fall for a few weeks now, today it's official!  If you know me personally then you know there's no secret that my favorite season is fall.  Yes the summer is wonderful, and I do love the heat, but nothing is quite like the changes that fall brings.  Years ago it meant back to school and marching band competitions.  But even though those days are long behind me, I still love this time of year.  So in honor of this amazing season, here is my first official top 10 list on this blog:  the Top 10 Reasons To Love Fall!

10 - Fresh Cool Air
Flickr photo by C4M30

Nothing lets us know that fall is here like the change in temperature.  The days of triple digit heat waves are over, and the perfectly comfortable fifties and sixties are here.

It's the time when the air conditioner gets turned off permanently until next year, windows are opened, and the cool fall breezes bring much needed fresh air into our homes.  Breathe it in deep.  Just remember to close the windows when it gets cold enough for you to see that breath!

9  - The Changing Leaves

Flickr photo by Konstantin Leonov
Typically the most obvious indicator that fall is here or fast approaching, the bright greens of summer turn into brilliant fall colors.  Nearly everything that was green around us starts turning a vast array of lovely fall colors.  Reds, oranges, yellows, browns, and purples in every shade.  

Just going for a walk around the neighborhood or making a special trip to a park (or Brown County, IN like many of us around here tend to do), to see all of these stunning colors produced by nature is amazing.  That's an even better way to enjoy that fresh fall air.  I wish the trees stayed like this longer!

8 - The JDRF Walk to Cure Diabetes

It's become a fall ritual for us.  Here in Indianapolis, the JDRF Walk to Cure Diabetes always takes place in late September or October.  Recruiting for our friends and family team and fundraising for JDRF is another reminder that fall is here.

On walk day, the  path the walk follows is one of the most beautiful places to be in Indianapolis in the fall.  It's a way to combine the fresh cool air of fall and the beautiful colors of all the changing leaves along with friends and family to support a worthy cause.

7 - Halloween!

Who doesn't love Halloween?  Free candy and you get to dress up as anything you want!  Ok, well my days of dressing up and getting candy are long behind me, but as a parent I get to revel in this joy with my children now.  Seeing people decorate for Halloween is the next best thing to Christmas lights, and seeing the children bring their favorite characters and animals or whatever they chose to be for Halloween to life in their costumes is a treat!

A few years ago we started a tradition of trick-or-treating with friends, and I'm looking forward to that again this year.  Also, I'm going to help my Grandma with her tradition of making popcorn balls to pass out to friends and family for Halloween treats, and it's a tradition that I plan to keep going in our family.

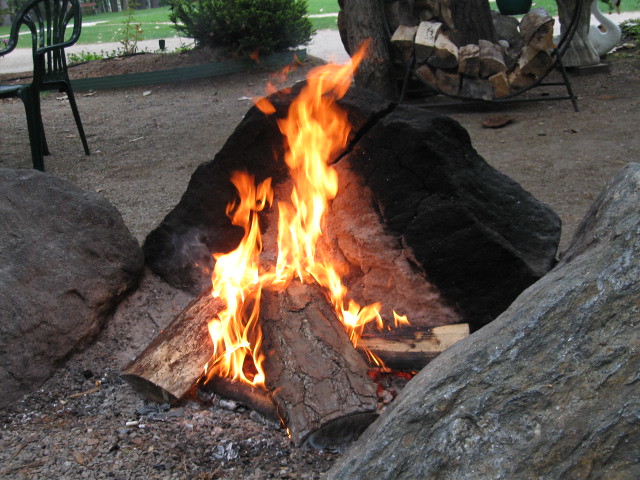
6 - Wood Burning Fires

Flickr photo by georgygrrl
One of the best smells on the planet, and they keep you warm!  Bonfires and wood burning fires in fireplaces make their reappearances this time of year.  Back in school the marching band would get together on a rare night off for a bonfire.  Those were so much fun.  I'll never forget my first time snipe hunting at one of those bonfires!  

We have a gas fireplace we've never actually used and no firepit, so I just have to inhale as much as I can when our neighbors are outdoors using theirs!  We sat outside the other night eating root beer floats enjoying the smell of a firepit a couple doors down from us.  I love when I'm out driving and catch the smell of a bonfire in someone's yard.  It's like a stranger just gave you a gift!

5 - Sweaters and Jeans
"Fall Faves" Created on Polyvore
Take a big comfy sweater (preferably in gray, but I'm slowly branching out into other colors!) and a favorite pair of jeans, and you've got my fall uniform!  It's also time to put away the flip flops and bust out the boots.  I also like to change out the sweater for a hoodie and the boots for flats because afterall, it is all about the comfort!

Being able to snuggle up into my favorite sweaters is definitely a fall favorite, especially those sweaters I picked up on clearance months ago that have just been waiting for these cooler temps!

4 - Apple Orchards
These next two can sometimes be knocked off the Fall Bucket List at the same time, but they don't have to be.  We love making an annual trip to the apple orchard.  There we get to snack on caramel apples, apple slushies, and so many other goodies!  We also like to get some fresh apple cider to take home.  Nothing beats hot apple cider on a cool fall evening!
We haven't been apple picking yet, but we've still got time.  Regardless of if we get them straight from the tree or from the orchard store, we'll be enjoying some really good apples!

3 - Pumpkin Patches

We also know that fall is here and Halloween is right around the corner when it's time to go pick out pumpkins.  The past couple years we've only painted our pumpkins, but this year we will be carving for sure!  I've got recipes lined up for the insides of those pumpkins that I can't wait to try.

There are so many great places around here to go pick your own pumpkin straight from the field.  It's pretty cute watching the little ones make their choice and even trying to figure out how to carry one!  Luckily we'll bring the wagon along to make that part easy!

2 - Pumpkin Scented Candles

Ok, maybe this shouldn't appear as high on my list as it does, but well it does!  I seriously love pumpkin scented candles!  This particular one is called "Spiced Pumpkin Pie", but regardless of what they call it, if it smells like pumpkin I want to use it!  I'll burn them for a few hours in the evening and the whole house just smells amazing.

I normally buy one every year this time of year, and it will last for a few months, but I think I may have to pick up a couple more to just keep this going all year 'round!

1 - Pumpkin Spice Lattes


Yes, I do believe I'm addicted to these.  And that's what makes them number one on my list.  I look forward to them all year long!  Strangely though until this year I've only ever ordered them hot.  I had no idea the iced version was just as amazing!  Unfortunately, I can't go out and get one whenever I want.  Thankfully though pumpkin spice coffee creamer also starts hitting the grocery store shelves this time of year, and it's much more budget friendly!

These are a wonderful treat from you know where, but Pinterest is full of at home versions I'm dying to try this year including this crock-pot pumpkin spice latte recipe!


I hope you've enjoyed my first top ten list!  I bet many of you share some of these fall favorites.  Leave a comment and tell me what other ways you celebrate this glorious season of fall!

Friday, September 21, 2012

D is for Dinosaur


We are having so much fun learning about dinosaurs.  And since "D" is for dinosaur, this letter D craft was just too cute to pass up.  We customized it by adding brads so our dinosaurs had moving parts to play with!


I've seen a few of these letter D dinosaur crafts going around Pinterest.  The one we liked the most is from Little Page Turners.  There wasn't a template to follow here, so I just prepped the materials by cutting out a capital letter D shape, legs, neck, head, scales, and tail from construction paper.  (There are double the materials in the picture above because each of my kids were making one).


The kids glued on the legs and scales.


We used brads to connect the head to the neck, the neck to the body (the letter D), and the tail to the body.


Then the kids glued on a googly eye (you could also use two eyes), and we drew on a smile.  Now we have a fun letter D dinosaur that moves!  My son said we should have used brads for the legs too because legs are supposed to move!  Oh well, maybe next time!


Then we used this $1 dinosaur book from the dollar store to see what kind of dinosaur we made.  We decided it had a long neck like a brachiosaurus but because of the scales was most likely a stegosaurus.  My son decided to call his "Steggy"!

Thursday, September 20, 2012

I've Been Working on the Railroad...

Choo Chooooo.  The first union station opened on this day way back in 1853!  Just so happens that union station is in our home city of Indianapolis!  In case you were wanting to celebrate this fun fact today, here are a few terrific train activities to do with your little ones.

Fingerprint Freight Train
One of our favorite train books is "Freight Train" by Donald Crews.  It's really neat to see all the different types of cars and different colors.  The story is very short, but still fun to read with the little ones.

This thumbprint/fingerprint activity from Craftoart.com is inspired by the book and is oh so cute!  I love these types of crafts that can become keepsakes!


3D Train with Tracks Craft

Train with Tracks from Parents.com

For a more three dimensional craft this adorable train and track craft from Parents.com should be tons of fun!  Who knew you could make such a cute train with a few wooden blocks, an empty spool, and wagon wheel pasta!  I think at the very least we will be making some craft stick train tracks!

Hand/Arm Tracing Train Craft


Train Craft from TheBestKidsBookSite.com

And lastly here's a fun craft where your child can trace their entire arm and hand and turn it into a train!

Since we are doing a dinosaur unit right now, we're going to get out our Dinosaur Train talking dinosaurs and have come fun!  There are also some great games and videos over at the PBS kids website for Dinosaur Train to check out!

Wednesday, September 19, 2012

Jalapeno Corn Muffins


This is the time of year for those warm comfort foods that are so yummy we can't remember why we wait till fall to have them!  For me, corn muffins are one of those foods.  I have a chicken and vegetable soup cooking in the crock-pot today, and I wanted just the perfect food to go along with it.  Just a hint of sweetness and kick from the jalapenos make these muffins a great accompaniment!


The muffin batter I use is the corn bread recipe from the Better Homes and Gardens New Cook Book.  I have a well used 11th edition as well as an incredibly well used 4th edition that was passed down from my great-grandmother.  Although the recipes are very similar I used the recipe from the 11th edition here.


I always make corn muffins when I use this cornbread recipe, and as written it's wonderful.  But the soup were having for dinner is pretty simple so I wanted to kick these muffins up a notch with a little something extra.  Corn and jalapenos did the trick!  I used a whole can of yellow corn and about a tablespoon of diced jalapenos.  They turned out great, but next time I don't think I'll use the whole can of corn and I will definitely add more jalapeno!  


I do make one specific change to the cornbread recipe though even when I don't add anything to the muffins.  I prefer to use buttermilk or sour milk if I don't have buttermilk on hand.  I'm not a scientist or a chef so I don't know why it makes them taste better, but it just does!  To make the sour milk all you need to do is add a couple teaspoons of lemon juice (yes I know real lemon juice would be better but it's just so much easier to keep one of these little guys in the fridge) or vinegar to a measuring cup, and then add enough milk to make 1 cup.  Give it a quick stir, and then let it sit for at least 10 minutes before using.

Jalapeno Corn Muffins

Ingredients:
  • 1 cup all purpose flour
  • 1 cup yellow corn meal
  • 2 tablespoons of sugar
  • 1 tablespoon of baking powder
  • 1/2 teaspoon of salt
  • 1 cup milk or sour milk
  • 2 large eggs
  • 1/4 cup cooking oil
  • 1/2 - 1 can whole kernel corn, drained
  • 2-3 tablespoons jalapenos, minced
Directions:

Preheat oven to 425 degrees.  Spray muffin tin with non stick spray and set aside.  In a large bowl, stir together flour, corn meal, sugar, baking powder, and salt.  In a medium bowl, whisk eggs and then add milk and oil.  Whisk to combine.  Pour wet ingredients into the large bowl and stir just till all is moistened.  Stir in corn and jalepenos.  Spoon batter into muffin cups (they will be very full).  Bake for 12-13 minutes.

*Recipe adapted from Better Homes and Gardens New Cook Book, 11 ed.


I used a 12 muffin pan here (a very old well used muffin pan!), but a mini muffin pan will also work; you will probably have more batter than you can use in one mini muffin pan though.  When you remove the pan from the oven you may also need to run a knife around the edge of the muffin to loosen (another sign of my very old well used muffin pan!).  


Carefully remove muffins from the pan and allow to cool slightly before eating.  These are delicious served with a bit of butter.  These pair wonderfully with a good soup, stew, beans or chili.  Break apart and put in the bowl or serve on the side!


Tuesday, September 18, 2012

Dinosaur Themed Sensory Tub

The items from our Back to School themed sensory tub and our Space themed sensory tub have been put away and replaced with our newest themes.  Last week I shared our Peter Rabbit tub, and today I'm going to share with you our Dinosaur themed tub.  This one was another that was a must make.  Dinosaurs are always a favorite in this house (probably a close second to monkeys).  The first animal sound my daughter learned was "Rawr" for dinosaur!


We plan on spending the next few weeks learning about dinosaurs before we dive into Halloween, Fall, and then Thanksgiving themes!  Oh how I love this time of year!  Our Peter Rabbit tub will stick around for a while though.  We are still having fun reading the book and going through the tub to find all the items as they are mentioned in the story.


I'm happy to have more of a mix of natural or recycled objects in this tub.  There are still lots of plastic pieces, but I'd say our tubs are improving.  With each one I create for the kids, I'm trying to incorporate more materials and textures.  The rocks and plants we collected from our own yard, and the plastic toys we already had.  The wooden dinosaur and the paper eggs I picked up at the craft store.


I also had to include a tiny but cute and recognizable dinosaur in this tub.  This is one of the characters from the PBS kid's show Dinosaur Train, and he fits perfectly into a leftover Easter egg to help show how dinosaurs hatch from eggs.


Object included in our Dinosaur tub:

  • Recycled brown paper filler
  • Recycled paper eggs
  • Wooden Wiggly Dinosaur
  • Dried plants
  • Rocks
  • Plastic plants and flowers - for the herbivores
  • Assortment of tiny plastic dinosaurs
  • Bone (to represent the dinosaur skeleton)

Check out my dinosaur board on Pinterest to get an idea of some of the projects we'll be doing as part of our Dinosaur unit.  I'm really looking forward to making dinosaur skeletons out of pasta, and making fossils out of Play-doh.  We'll also be making dinosaur feet out of old tissue boxes, and so much more.

We've already picked up two new dinosaur themed chapter books and a few other books to learn about dinosaurs from the library, and we've also got our Dinosaur Train talking dinosaurs for even more fun!  Bring on the "Rawwwwwwwwrrrr"s!

Monday, September 17, 2012

Helping Hands for JDRF!


In just three weeks, I will be participating in the JDRF Walk to Cure Diabetes in Indianapolis, Indiana.  I have been doing the walk since 2004, when the company I worked for at the time sponsored the event.  Over the past several years, we've had several family members and friends join us for the walk, and we've grown from registering as individual walkers to forming this friends and family team.

JDRF Walk to Cure Diabetes 2011
JDRF is near and dear to me because its striving to find a cure for a disease that has affected and continues to affect many people I know.  My grandfather, Gene Hand, was a diabetic.  He had one leg amputated and had to take insulin shots daily for years.  I chose the team name, Helping Hands, in remembrance of him.  My mother, my sister, my cousin, my uncle, second cousins, friends, and many many more, have all been affected by diabetes.

JDRF may focus their research on type 1 diabates, but I believe that JDRF is on the right track to finding a cure for diabetes in general.  I have no doubt that a cure or even progress towards a cure for either type of diabetes will greatly affect the research and finding a cure for all types.  And definitely check out JDRF's homepage for the latest and greatest on their progress and advancement in finding the cure!

If you'd like to join us for the walk this year, please check out our walk team's website below.  We'd love to have as many people as possible join us in supporting this worthy cause!  It's a couple hours of your time on a beautiful fall Saturday morning.  This is one of the most gorgeous parts of Indianapolis as well.  The walk starts in Military Park and goes by the IUPUI campus, behind the Indianapolis Zoo and through White River Gardens and over the canal.  You will not find a more beautiful path in this city, and to go on such a beautiful walk with thousands of people!  Bring your camera for sure!

Kids, dogs, strollers, wagons all welcome!  We hope to see you there!


Helping Hands Walk Team Page:  


Walk Details

Date:

October 6, 2012

Walk Location:

Military Park
601 West New York Street
Indianapolis, IN

Registration Start Time:

9:00 AM

Walk Start Time:

10:30 AM

Length of Walk:

5K (3.1 miles)


Message from JDRF:
We are taking steps to help JDRF achieve its goal of improving the lives of all people affected by type 1 diabetes (T1D) by accelerating progress on the most promising opportunities for curing, better treating, and preventing T1D. By joining our Walk Team and making a donation, you will be helping us to raise funds to directly support research with the greatest potential to conquer this disease.

We are motivated by the courage and perseverance of those facing the everyday challenges of type 1 diabetes - they are the reason we challenge ourselves to give more, to do more, to achieve more. We challenge ourselves to make a real difference in the lives of those with T1D.
Will you accept the challenge to make a difference by walking with us? All we need you to do is click on the "Join this Team" button, make a donation, and begin fundraising. It is simple, fast, and fun!
Thank you for your support, and we'll see you on Walk day!
If you can't make it to the walk, please consider supporting this cause by making a donation to our team.  We are so grateful for the support and the knowledge that one day there will be a cure for diabetes!  Thank you!

Friday, September 14, 2012

Maple Oatmeal Apple Crisp

I love apple crisp, and I love maple oatmeal so it definitely wasn't a big stretch to combine the two.  I know many people make fruit crisps with oatmeal in the topping, but this was a first for me.  This particular recipe came about because I was out of brown sugar.  Every apple crisp recipe I could find called for brown sugar.  There was no time for a trip to the store, so I had to improvise.  I've read that you can make brown sugar by adding molasses to granulated sugar, but  I didn't have any molasses either.  So I began thinking what else might make a good substitute and started searching the cabinets.  Even though I didn't have brown sugar or molasses, I did have good old fashioned maple syrup!  So why not give it a try.  And voila, maple oatmeal apple crisp was born! (Well not born, but baked!  You get the picture!)


Using this quick and easy apple-oatmeal crisp recipe as I guide,  I made my own maple oatmeal apple crisp. I knew I'd be using a 9x13 pan and was making this to take to a dinner party so I essentially doubled that recipe and then began tweaking it.


To start, I peeled and cored 8 Granny Smith apples.  Then I sliced them thin and cut the slices in half.  I wanted small pieces that I knew would cook thoroughly.  Gently toss the apple pieces in a bowl with the lemon juice.  Then sprinkle with the cinnamon and sugar.  Spread evenly in pan.


For the oatmeal crisp, I started by softening two sticks of butter.  Either plan ahead here or carefully soften in the microwave.  Then I pulled out my food processor to do the rest of the work for me.  Add the sugar and maple syrup to the food processor and pulse several times to combine.  You might need to run a spatula around it to make sure it all gets mixed together.  Then add the butter, flour, and cinnamon and pulse again until thoroughly mixed.  Lastly add the oatmeal and give it a few more pulses.

Thanks to the maple syrup this mixture sticks together pretty well, so gently break it up into small pieces and spread out on top of the apples.  Bake and enjoy.  Don't forget the ice cream to go with it!


Maple Oatmeal Apple Crisp

Ingredients:

Apples
  • 8 Granny Smith apples; peeled, cored, and sliced
  • 1 tsp lemon juice
  • 1 tsp sugar
  • 1 tsp cinnamon
Oatmeal Crisp

  • 1 1/2 cups granulated sugar
  • 1/3 cup maple syrup
  • 1 cup (2 sticks) butter; softened
  • 1 cup flour
  • 1 1/2 teaspoons cinnamon
  • 1 1/2 cups oatmeal
Directions:

Preheat oven to 350 degrees.  Toss apples in a bowl with lemon juice, sugar, and cinnamon.  Spread apples evenly in 9x13 glass baking dish.  In food processor, combine sugar and maple syrup.  Pulse till thoroughly mixed.  Add butter, flour, and cinnamon.  Pulse until combined.  Add oatmeal, and pulse 2 to 3 more times to combine.  Spoon oatmeal crisp on top of apples, and gently break apart and spread evenly across the top.  Bake for 35-40 minutes (I went all the way to 40 to get a nice crisp on the top.).  Serve with vanilla ice cream or whipped cream.
*Recipe adapted from Cooks.com

Wednesday, September 12, 2012

Thanks for the Feature!

I sat down at the desk this morning with my coffee and proceeded to check my email like I always do.  It's normally a bunch of junk email with just an occasional nugget of useful information.  This morning though I had a fantastic surprise!  I saw I'd been mentioned on Twitter and discovered my blog post from yesterday was featured today in a Parent/Teacher Daily newsletter from Living Montessori Now!


I seriously love Living Montessori Now, and if you've never checked it out, definitely make the time.  Fan them on Facebook too to get quick access to awesome free daily printables and lots of other wonderful posts!

What a great way to start the morning!  Thanks Deb, you made my day!!

Peter Rabbit "Cottontail" Transfer Tray

Yesterday I posted about the newest tray I setup for my oldest to work on, learning number words by sight using "cottontails".  Today I'm going to share with you the one my daughter is using as a transfer activity moving cottontails from one bowl to another.


I already mentioned how our first dry pour activity started off a success, but quickly went downhill.  I'm still finding dry beans around the kitchen and living room.  It will probably be a while before I give beans another chance around here, but their replacement - pom poms - seems to working out better.


We had been using a variety of mini pom poms to do a color sorting activity, but for this particular tray I just pulled out all the white ones to use as white rabbit tails, or "cottontails".  My two year old will use the tiny spoon to move each cottontail one at a time to the other bowl.


It's still pretty tricky for her, and she won't always just move one pom pom or sometimes it won't make it in the bowl, but she keeps at it.  Although she is really good about turning the tray around when she's ready to start again!


And when they decide they're done with the trays, there's always these fun Peter Rabbit coloring pages.  The Peter Rabbit coloring book we have goes through the whole story, so we talked about what was happening in the story from the pages they chose.


It's just so cute to watch the little ones color!


Tuesday, September 11, 2012

Peter Rabbit "Counting Cottontails" Tray

We are having a lot of fun with our Peter Rabbit theme this week.  If you missed it earlier, here's a link to my post about our Peter Rabbit themed sensory tub.  I'm so happy the kids enjoy this story as much as I do! (Well maybe not as much as I do, but that's only because I REALLY love this book!)  I also decided it was time to change up our trays this week, so here's a look at the first of our Peter Rabbit themed trays.  

We have been working a bit on sight words with my four year old, so I decided to make a tray to help him with recognizing the number words by sight.  I made these self-checking cards by writing the word for each number on one side of a blank index card and writing the corresponding digit on the back.  I used zero through ten.


I use a piece of black construction paper folded in half for a work mat.  And there's a cup holding all of the cottontails (simply cotton balls!) He selects a card and counts out the correct number of cottontails.  


And if he gets stumped or to check his work he simply flips the card over to see the number.


He seemed to really enjoy this activity, and I think he'll know these number words by sight in no time.  He's really good at two (his sister's age), four (since it's his age), and zero!  He loves doing zero and showing you that there are no cottontails!


Thursday, September 6, 2012

Peter Rabbit Sensory Tub

I am beyond excited about our newest sensory tub.  My husband gave me the idea for this one, and I couldn't wait to get started on it!  If you know me at all you know I'm a fan of anything that has to do with rabbits.  I've loved Peter Rabbit since I was little, and I'm doing my best to make sure my kids love him too! My son was Peter Rabbit for his first Halloween, and he also had a Peter Rabbit themed first birthday party!  That was a while ago, but now that we are getting into these sensory tubs, it only made sense to make a Peter Rabbit themed tub too!


I've seen a lot of gardening themed sensory tubs that include elements of the Peter Rabbit story, or where people have used the story to go along with spring time and gardening themes tub.  I'm not going to use this tub to introduce gardening although we will talk about ways to use all the objects in the tub including the gardening tools.  I just wanted all the objects in the tub to represent something from the story.

However instead of gardening, while we are learning the story of Peter Rabbit, we will be focusing on the topics of fruits and vegetables, eating healthy, and what happens when you get sick (and how to get better).  Both of my kids have colds this week, so it's ironically perfect timing for that little lesson.


The filler for this tub is from a bag of Spanish moss.  It has a wonderful texture and very Earthy smell so it does a great job of representing the dirt of the garden and forest in the story!


Here are some close up shots of what's included in our sensory tub.  The gardening tools represent the tool shed that Peter ran in to hide and also Mr. McGregor working in his garden.  The small flower represents the flower pots that Peter knocked over.  There are three "brass" buttons for the buttons on Peter's jacket.  These small buttons are deceptively heavy so that's a nice surprise when you pick one up!  The net that Peter's buttons got tangled up in is represented by the small square of brown shelf liner.  (I considered using medical gauze or cheesecloth for the net, but both of those were white and I would have wanted to dye them brown.  Since this shelf liner was already brown, it was an easy pick!)  The berries are for the blackberries that Peter's siblings went to gather.  The cup and the spoon are for the teaspoon of tea that Mrs. Rabbit gave to Peter when he was sick.


The "food" pieces are from my kids' kitchen set.  There is a slice of pie because Peter's father was put into one of Mrs. McGregor's pies.  I've also included a carrot (just because everyone knows rabbits like carrots!), peas because the mouse in the story was carrying peas in her mouth, an onion because Mr. McGregor was hoeing onions, and lettuce because that's one of the vegetables that Peter stopped to eat.  The loaf of bread is for Mrs. Rabbit buying bread at the baker's.  


There's a small shoe by the fence that represents Peter losing his shoes in the garden, and of course the fence because Peter had to crawl under the fence to get in and out of Mr. McGregor's garden.  

The most difficult piece to find for this tub was a watering can.  This time of year, watering cans are few an far between, especially the miniature one I was looking to include here.  Waiting till springtime would have been easier, but I was too excited about this tub to wait!  So I improvised.  I used a small plastic measuring cup from the kid's kitchen set and wrapped it in duct tape to make it silver like metal.  Voila, instant watering can!  Inside it is a small toy rabbit.  


I also pulled out our collection of Peter Rabbit books to go with the sensory tub.  We have two copies of the  original story.  (One my mom gave to me in 1994!)  The "Peter Rabbit Says" book is a cute little story using several Beatrix Potter characters that play a memory game while waiting in line at the general store.  There's a Peter Rabbit board book, a coloring book, and a large Beatrix Potter journal that is more like a scrapbook of everything Beatrix Potter.  There are lots of little snipits and pictures about Peter Rabbit throughout the journal.  


And the last little book is "Pierre Lapin", Peter Rabbit in French!  I was so excited to find this book!  We'll spend our French lessons working on words from this book, and then try to identify the objects in the sensory tub using French.

Check out the sensory tubs link at the top of the page to see the other sensory tubs we've made!